
How Long to Charge Agriculture Drone Battery? Guide to Field Efficiency
In modern precision agriculture, time is money. Whether performing large-scale pesticide spraying or fertilizer spreading, the core question drone pilots ask most is: How long to charge an agriculture drone battery?
Charging speed directly determines operational efficiency and how fast a team can transition between fields. This article breaks down agriculture drone battery charging times, the key influencing factors, and how to achieve high-efficiency fast charging safely.
Table of Contents
Quick Answer: How Long to Charge Agriculture Drone Battery?
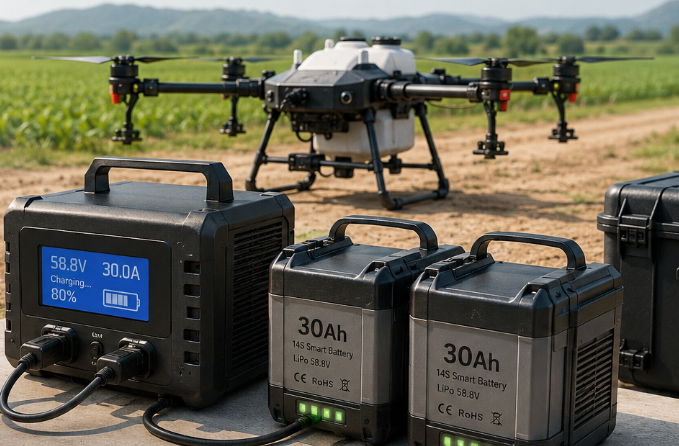
Using original, industrial-grade smart super-charging equipment or inverter charging stations, a modern smart agriculture drone battery typically takes 15 to 30 minutes to fully charge. However, using a standard balance charger without fast-charging capabilities can stretch that time to 1 to 2 hours.
To help you plan your field operations, here is a breakdown of actual field charging times by battery capacity and charger type:
| Battery Capacity | Charger / Station Type | Actual Field Charging Time (to 95%) | Typical Drone Models |
| 15,000 – 20,000 mAh | Industrial Standard Fast Charger | 20 – 30 minutes | Small to medium spraying/spreading drones |
| 30,000 mAh | 7000W+ Inverter All-in-One Station | 11 – 15 minutes | DJI T40, XAG P100, etc. |
| 40,000 mAh+ | 9000W+ All-Round Inverter Station | 9 – 13 minutes | Latest heavy-payload agriculture drones |
| Any Capacity | Standard Indoor Balance Charger | 60 – 90 minutes | Warehouse maintenance / non-operational slow charging |
4 Core Factors Determining Agriculture Drone Battery Charging Speed
Why can you unplug and go in 15 minutes sometimes, while other times you wait for over half an hour? It comes down to these four variables:
1. Charger Power and Current
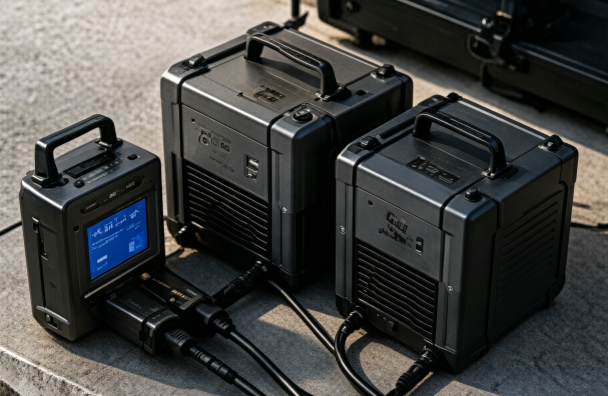
Batteries of agriculture drone hold massive amounts of energy (typically 20,000 mAh to over 30,000 mAh). Standard household or consumer-grade chargers simply cannot handle them. Field operations require 7000W to 9000W+ industrial-grade inverter charging stations. Higher power equals higher output current, which dramatically cuts charging time.
2. Battery Temperature and BMS Protection
After high-load flights, a drone battery’s internal temperature runs very high. For safety, the Battery Management System (BMS) restricts charging until the battery cools down to a safe range (usually below 40°C–45°C).
Note: If you don’t cool the battery first, the overall turnaround time will sneakily extend by 10 to 15 minutes.
3. Ambient Temperature
Extreme heat or cold impacts lithium battery activity. In scorching summers, slow heat dissipation delays charging. In freezing winters, the BMS must trigger a pre-heating mechanism to warm up the cells before initiating high-current fast charging.
4. The CC-CV Charging Profile
Lithium batteries use a Constant Current-Constant Voltage (CC-CV) charging method. For the first 80% of the charge, the charger runs at full throttle. Once it passes 90%, it switches to a trickle charge to protect battery health. This is why the last 10% always feels like it takes the longest.
How to Safely Charge Agriculture Drone Batteries
Drone batteries (typically high-rate LiPo or smart lithium batteries) pack immense energy density. Given the unpredictable nature of field environments, safe charging is your first line of defense against fires and property damage. Always follow these 6 Golden Rules of Field Charging:
Always Use OEM or OEM-Certified Super-Chargers:
Intelligent agriculture battery systems have intricate BMS communication protocols. Do not ever alter the charging cable nor utilize any third party chargers that are not certified, as excess current may lead to thermal runaway.
Never Charge Immediately Post-Landing:
An agriculture battery system right after landing may go above 50° Celsius. Attempting to charge the battery when it is above 50° Celsius may trigger the BMS to reject the battery for being too hot. It is necessary to cool down the battery using a forced air cooling chamber or a water chamber before attempting to charge it.
Set Up a Dedicated Field “Charging Zone”:
- Charge in a well-ventilated, dry area away from direct sunlight.
- The distance between the charger/generator and the batteries being charged must be no less than 5 meters.
- Charging must never be done in proximity to flammable material such as fertilizers, pesticides’ boxes made of cardboard, and dried grass.
No Blind Charging (No Unattended Charging Units):
The pilot or any other crew member must do routine checks of the charging area. In case of abnormal heating of the battery, unusual sounds, smoke, or rapid swelling, the power supply to the charger must be disconnected.
Inspect Ports and Exterior Before Every Charge:
Check the metal pins on both the battery and the charger. Clean off any dust, chemical residue, or dark oxidation with an alcohol wipe. Poor contact creates localized hotspots that can melt plastic housing.
How to Scientifically Extend Your Drone Battery Life?
Large-capacity agriculture batteries are a major investment. Proper maintenance can boost a battery’s lifespan from 300 cycles to over 500 cycles, directly slashing your farm’s operating costs. Commit to these Do’s and Don’ts:
1. Do Not Push Batteries to the Absolute Limit (Avoid Deep Discharge)
Never drain your battery to 0%. Set your drone’s Return-to-Home (RTH) threshold to 15% – 20%. Deep discharging drops internal cell voltage too low, causing irreversible capacity loss or rendering the battery completely dead and unchargeable.
2. Do Not Store at Full Charge
Avoid keeping batteries at 100% capacity for more than 48 hours.
The Right Way: If you do not plan to fly for 3+ days, use your charger’s Storage Mode to discharge or charge the battery to 40% – 60% (roughly 3.8V – 3.85V per cell). While modern smart batteries have an auto-discharge feature, doing it actively is safer and generates less passive heat during storage.
3. Protect Against Extreme Temperatures
Summer: During field transitions, never leave batteries locked inside a hot, unventilated vehicle trunk baking under the sun.
Winter: For off-season winter storage, never keep batteries in a freezing warehouse. Sub-zero temperatures destroy lithium-ion activity. Store them in a dry, indoor environment between 15°C and 25°C.
4. Perform Regular “Battery Calibration”
It is necessary to periodically conduct a complete calibration of the batteries every 20 to 30 charges. For this purpose, you should charge the battery to 100% using a balance charger in a room for a long time, discharge it statically on the drone to about 10%, without flying it, and slowly charge it to 100%.
How Pilots Achieve Field Fast Drone Charging?
To a professional pilot, keeping the drone airborne without breaks does not involve purchasing a whole set of costly batteries but rather learning how to utilize the timing. In a “3 Charges, 1 Flight” technique, it is possible to ensure non-stop operations during the day with just 3 batteries:
Battery A (In the Air): Performing high-intensity spraying or spreading. Average flight time: 10 – 12 minutes.
Battery B (Forced Cooling): Just landed and highly heated. It goes straight into the cooling zone for a 10-minute rapid cooldown.
Battery C (Full-Throttle Fast Charge): Already cooled down and connected to a 9000W inverter station. It takes just 11 – 15 minutes to hit 95% and stand by.
Flight Time (~11 mins) ≈ Charging Time (~12 mins)
As long as your cooling speed matches your charging speed, the drone only needs to land for a 30-second battery swap before taking off again.
Leverage Industrial Cooling (Air vs. Water)
Modern ultra-fast charging depends entirely on heat dissipation. On hot summer days, relying on ambient air will break your cycle time.
Air-Cooled Charging: Uses charging cases with high-speed brushless fans to force heat away via dedicated air channels.
Water-Cooled Charging (The New Gold Standard): Slots the smart battery directly into a specialized water-cooling tank. Utilizing the high specific heat capacity of circulating water, it cools the battery while it fast-charges. This prevents the BMS from throttling the current due to heat, locking in that 15-minute fast charge every single time.
Respect the 15% – 20% Battery Redline
Don’t try to squeeze out an extra acre by draining the battery dry. Landing at 15% – 20% protects the lifespan and keeps your schedule tight. Draining it further forces the charger to use a low-current “recovery mode” at the start of the cycle, adding 5 to 10 minutes to your total charge time.
FAQ: Agriculture Drone Battery Charging
Q1: Can I use a standard hobby LiPo charger to charge my agriculture drone battery?
Absolutely not. Drone batteries for agricultural purposes (Smart Batteries) have very special high voltage curves and enormous capacities. Incompatible charger won’t even try to charge, break the BMS chip, or start an awful fire.
Q2: Why does my battery slow down significantly after reaching 95%?
This is a built-in safety feature. The BMS automatically lowers the current at the end of the cycle to perform balance charging. This ensures every individual cell reaches the exact same voltage, maximizing the overall lifespan of the pack.
Q3: Does fast charging shorten the life of an agriculture drone battery?
Not if you use official, certified smart fast-charging equipment. Agriculture batteries in modern times are made to withstand high C-rates, and the BMS manages current according to the battery’s temperature. Nevertheless, employing high-powered equipment not certified by the BMS will make the battery deteriorate faster.
Final Takeaway
Ultimately, the answer to How long to charge an agriculture drone battery? depends heavily on your setup. Investing in a high-efficiency smart inverter fast-charging system can compress charge times down to 15–25 minutes, the single best way to scale up your seasonal field efficiency. By building habits around cooling first, charging second, and avoiding deep discharges, you will work faster while saving thousands on premature battery replacements.